How To Setup Firebase Emulator Suite for your react projects
And ⚡ Boost your local development
What is Firebase
Firebase is a Backend-as-a-Service (Baas). It provides developers with a variety of tools and services to help them develop quality apps, grow their user base, and earn profit.
Key features
- Authentication
- Realtime database
- Storage
- Hosting
To start with Firebase, The first thing you have to do is Login to Firebase console, Create a new project, get the project Config, install Firebase SDK and Initialize firebase with project Configuration in your react application and you are ready to go.
But in this case your app will interact with the firebase services which are not suitable for development purpose as some of the services are paid services and it can be a slow development environment also if your project is Open Source or a lot of people working on the project it would be a pain for them to work on the project, And that's why Firebase gives you a handy tool called the 'Firebase Emulator Suits'.
What is Firebase Emulator Suits
The Firebase Local Emulator Suite is a set of advanced tools for developers looking to build and test apps locally using Cloud Firestore, Realtime Database, Cloud Storage, Authentication, Cloud Functions, Pub/Sub, and Firebase Hosting. It provides a rich user interface to help you get running and prototyping quickly.
Now that you know what is Emulator Suit and How it can help you with your development,
Let's learn how to use it
If you are following this part it assumes that you have already created a firebase project and initialized with your project Configuration.
Start with installing Firebase CLI
npm install -g firebase-tools
Log into Firebase using your Google account by running the following command
firebase login
Let's see if it really connected to your firebase or not
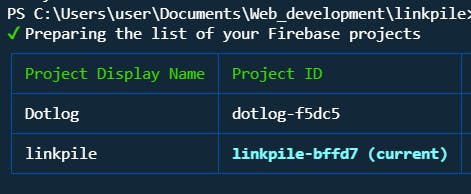
run this command firebase projects:list and it must list your firebase projects something like this, it will also show which is your current project

If you have'nt initialized any projects yet, Initialize your project with this command
firebase init
Make sure you are inside your project directory while running this command

Select the firebase services you are using and don't forget to select Emulators as we are going to use it.
Now Let's initialize the Emulators
Before Initializing the emulators make sure you have Java version 1.8 or higher installed
firebase init emulators
This command starts a configuration wizard that lets you select emulators of interest, download the corresponding emulator binary files, and set emulator ports if the defaults are not appropriate.
The emulators will take Security Rules configuration from the database, firestore and storage configuration keys in firebase.json and set the emulator Configuration if you specified some other ports other than defaults. something like this :
//existing configuration ....
...
...

"emulators": {
    "firestore": {
      "port": "8080"
    },
    "ui": {
      "enabled": true,
      "port": 4000
    },
    "auth": {
      "port": "9099"
    },
    "pubsub": {
      "port": "8085"
    }
  }
}
Let's set up your project to use Firebase Emulators when its running on local host
This is how you can initialize your firebase app to use emulators when it's running on localhost and use the real config when its running on production
// firebase.js
import { initializeApp } from "firebase/app";
import { getAuth, connectAuthEmulator } from "firebase/auth";
import { getStorage, connectStorageEmulator } from "firebase/storage";
import { getFirestore, connectFirestoreEmulator } from "firebase/firestore";

const firebaseConfig = {
  apiKey: process.env.REACT_APP_FIREBASE_API_KEY,
  authDomain: process.env.REACT_APP_FIREBASE_AUTH_DOMAIN,
  projectId: process.env.REACT_APP_FIREBASE_PROJECT_ID,
  storageBucket: process.env.REACT_APP_FIREBASE_STORAGE_BUCKET,
  appId: process.env.REACT_APP_FIREBASE_APP_ID,
};

const hostname = window.location.hostname;

// Initialize Firebase
const app = hostname === "localhost" ? initializeApp({
        apiKey: "demo-key",
        authDomain: "demo-test",
        projectId: "demo-test",
        storageBucket: "default-bucket",
      })
    : initializeApp(firebaseConfig);

export const auth = getAuth(app);
export const db = getFirestore(app);
export const storage = getStorage(app);

if (hostname === "localhost") {
  connectAuthEmulator(auth, "http://localhost:9099");
  connectFirestoreEmulator(db, "localhost", 8188);
  connectStorageEmulator(storage, "localhost", 9199);
}
Make sure you put Demo keyword in config to start it as demo project
Inside package.json add this line of code to your scripts, it will run the emulators for you and export the data whenever you stop the emulators and use the exported data on next time you run the emulators.
// package.json
"scripts": {
      ....,
    "emulators": "firebase emulators:start --project demo-test --import=./savedData --export-on-exit",
     ...,
}
Now the setup is complete Let's check if it works
- start the emulators with
npm run emulators - start the project
npm start
you should see a message indicating running on emulator mode something like this:

⚠ Facing problems while running Firebase emulators?
- Firstly, Check if you have Java Installed.
- If you have Java installed and still getting error!
try this:
👉 go to the firebase.json and edit the emulator config as follows
"emulators": {
    "auth": {
      "port": 9099,
      "host": <your local Ip>
    },
    "firestore": {
      "port": 8188
      "host": <your local Ip>
    },
    "storage": {
      "port": 9199
      "host": <your local Ip>
    },
    "ui": {
      "enabled": true,
      "port": 4000
      "host": <your local Ip>
    }
  }
👉 after this go to firebase.js and edit the file as follows
if (hostname === "localhost") {
  connectAuthEmulator(auth, "http://<your local Ip>:9099");
  connectFirestoreEmulator(db, "localhost", 8188);
  connectStorageEmulator(storage, "localhost", 9199);
}
